Monday, December 30, 2013

Top 5 Posts of 2013

I thought that as we wind up this year I would take a look back on my blog and bring you the 5 most popular post of 2013. Granted I have only been blogging on Hooked on Pinterest since May I still had some memorable posts that were as much fun too write about as they were to create.


Top 5 of 2013


#5 - Flower Pot Cake: Food Network

 Flower pot cake

This was one of my first posts on this blog. It was absolutely a fail, but it did taste pretty good.


#4 - DIY Outdoor Curtains from Drop Clothes

Outdoor Curtains from Drop Clothes

This project worked really well at first, it gave us the shade that we needed in our backyard and looked really nice. The problem we found later was that since we live on the coast and have high humidity in the summer the curtains started to grow mold and we had to throw them out. I think that if you live in an arid climate this project would work very well.


#3 - Pinterest Kid Craft: Turkey Hats

 Turkey Hats

This was a great, fun Thanksgiving craft!


#2 - Pinterest Kid Craft: Leaf Wreaths

 Leaf Wreaths

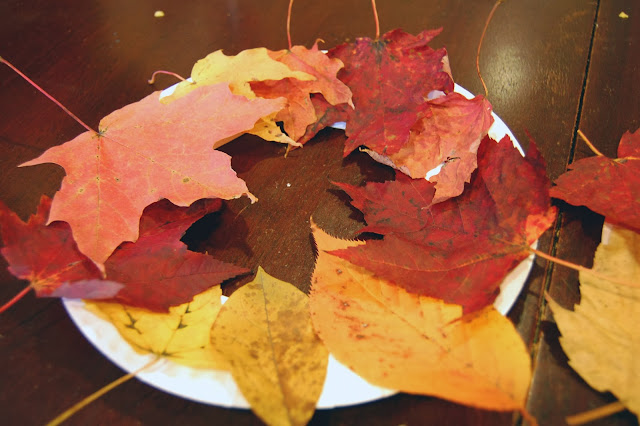
This was a fun fall craft, that got you outside for some fun too!


#1 - Cinderella Costume and Coach

 Cinderella Costume and Coach

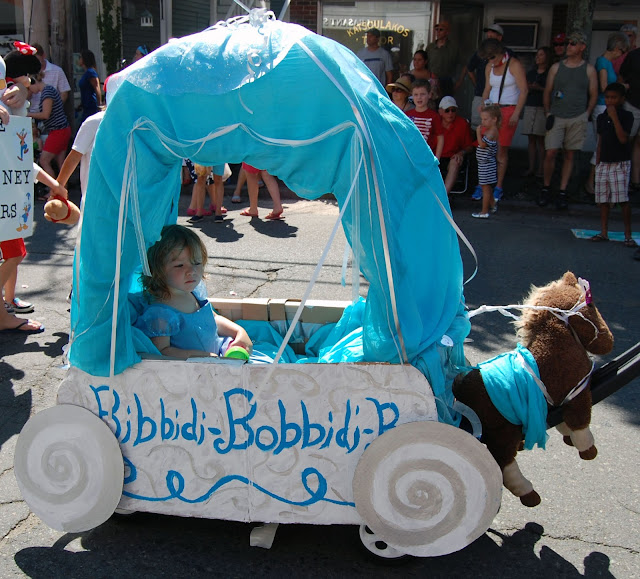
This was by far the largest craft project and most creative craft project that I took on in 2013. My grandmother made my daughters dress and I constructed the Coach. Although it was really hot on the day of the parade, my daughter still had a great time being Cinderella.


I had a great time writing this blog during 2013. I hope you all had a great time following on my journey and I look forward to sharing more of my Pinterest journey in 2014.

Saturday, December 28, 2013

Happy New Year!


Happy New Year!


I hope that 2014 brings you all joy and happiness and lots of Pinterest fun!

Wednesday, December 25, 2013

Merry Christmas


Merry 
Christmas
to 
Everyone


I hope everyone has a great Christmas with many family and friends.

Monday, December 23, 2013

Pinterest Recipe: Sweet Dilly Pickles: Last Minute Christmas Gift

I made these pickles over the summer and the recipe made 4 pints of pickles so I gave some to my family. They liked them so much I thought that I would make some to give at Christmas. If you are looking for a quick, inexpensive homemade Christmas gift these are great. My 2 year old even helped make these pickles, it only took about 30 minutes.


After I washed and cut the cucumbers. I gave them to my 2 year old to put in the jars, she loved doing this.


Then she helped me measure out the ingredients for the brine. I cooked the brine, let it cool and poured it over the cucumbers. The last thing that my 2 year old helped me, which she really loved was shaking the jars to spread out the spices in the brine.


Another thing that makes this a great last minute gift is that the pickles are ready to eat the next day.

Wednesday, December 18, 2013

Wrapping Presents with Toddlers


So, this year I have been trying to incorporate my 2 year old in as many Christmas activities as possible. Since decorating the tree and building/decorating the gingerbread house went well, I thought I would try wrapping presents. This one turned out to be more frustrating for both of us rather than a fun activity. She wanted to be part of every aspect of the wrapping experience, cutting, taping, folding, writing on tags and placing the tags on. I only wanted her to assist in taping and placing the tags on. Anyone who can avoid doing this activity with a 2 year old, should. I think I will try again next year when she is 3 years old.

Monday, December 16, 2013

Gingerbread House with Toddlers

I got the idea to build and decorate a gingerbread house with my toddler. I knew right away that I was not going to have time to bake the gingerbread and create the whole thing from scratch. So, what I did was buy a gingerbread house decorating kit with pre-made house pieces. I got mine for about $6 on sale at A.C. Moore, here is one that you can buy from Amazon.com.
 

I enlisted the help of my husband in building the house and it really did take two adults with a toddler to be able to put the house together. Once that was done we had to let it set, which was good because our daughter was starting to lose interest.


The next day my daughter and I decided to decorate the house. I knew it was not going to look like the one on the box, I decided that we would put a door on the front and ice the roof and decorate it. This was perfect because my daughter was able to decorate it on her own after I frosted it.

Result:


We had a great time making this house that only cost us $6. Definitely doing this again next year.

Wednesday, December 11, 2013

Decorating a Christmas Tree with a Toddler

This year I wanted to include my toddler more into the decorating of the tree. She is older now and I thought that she would have fun with it. My husband set up the tree and strung the lights. I removed all the breakable ornaments from the box and then let her fave at it.

Overall, this went pretty well. She started to get bored about 1/2 hour into it, so me and my husband finished the last few ornaments. I think that anyone who has a toddler should not be afraid to include them in decorating the tree. They love helping and participating in Christmas.

Result:


Monday, December 2, 2013

Christmas Craft: DIY Advent Calendar

After my husband and I got married I wanted to start some Christmas traditions of our own. I saw the idea of creating an ornament advent calendar on a talk show and thought that it would be a cool tradition to start. I decided to design my own version of the one that I saw on TV. I used poster board, thin fabric, card stock, push pins and a black sharpie. We have been doing this tradition now for 6 years and will be for many more, each night we put a new ornament on the tree. We usually have to put the first few on all at once because we don't get our Christmas tree right on the 1st.

Result:


Monday, November 25, 2013

Pinterest Kid Craft: Hand Print Turkey Puppet

Here is another of the fun Thanksgiving crafts that I have been creating with my daughter. These turkey puppets took us about 20 minutes to complete start to finish and didn't cost us anything because we just used items that we had on hand.

Items used:
-Hand
-Crayons
-Card Stock
-Scissors
-Tape
-Straw

Pin: http://www.loveplayandlearn.com/2012/11/thanksgiving-hand-print-turkey-puppet.html


Result:


Wednesday, November 20, 2013

Pinterest Kid Craft: Turkey Spoons

My daughter and I have having so much fun creating Thanksgiving Day crafts. I found another fun craft that transforms a white plastic spoon into a turkey.

Pin: http://www.rd.com/advice/thanksgiving-craft-for-kids/


All you need for this craft is construction paper, glue, a white spoon and a black sharpie marker.

Result:


Monday, November 18, 2013

Pinterest Kid Craft: Turkey Hats

I am always looking for fun crafts to do with my daughter. This time of the year we try to make our crafts relate to the holidays. When I found this cute Turkey Hat on Pinterest from Parents magazine, I knew my daughter was going to love creating this festive hat.

Pin:

                 Thanksgiving turkey hat! #turkey #thanksgiving

I happen to have all the items required to create this fun hat, so there was no cost. I'm always looking for crafts that do not require me to spend any money or bring anymore supplies into our already cramped house. All you need is a paper plate, construction paper, crayons or paint, scissors and a glue stick. 


Result:


We had so much fun creating this hat. Probably will be creating these again next year.

Monday, November 11, 2013

Pinterest Home Improvement: Headboards

If you have been following my blog, you'll know that we are going through a pretty major renovation to expand our bedrooms to give our family more room. If not, here is a link to the latest post about our renovation. In the process we are also redoing our bedroom, the only room in the house that we have not touched since moving into our home. One of the projects that I have been wanting to tackle for a while now is to create a custom headboard for our bed. We have never had a headboard in our adult lives so this is very exciting.

I went on Pinterest to get some ideas about how to create a simple, inexpensive padded headboard. There was plenty of inspiration to be had.

Pins:

How to make an upholstered headboard. It's super easy.
Young House Love (One of my all time favorite blogs)
20 DIY Headboards
20 Headboard Ideas from Babble.com
                                                                                           
demingdesignstudio: DIY Headboard
Deming Design Studio


In the end our design most closely resembled the design of Deming Design Studios headboard. 


My husband went to home depot and had them cut a piece of 3/4" plywood to the correct size. Then we cut a 2x4 to fit across the top of the board, this way when we cut the 2x4s for the legs they would be easier to get level.  We sprayed the bottom of the legs black so that they would blend in wtih the frame. Once the frame was built (my Mom and Dad helped with this whole process) we stapled four layers of extra loft batting to the frame. I got two packages of extra loft batting from Joann's fabric.


The top corners were a bit tricky, because of the amount of extra batting that gathered there.


What we ended up doing was cutting down the middle of the flap, then we cut off some of the extra batting and folded the other side over and stapled it to the 2x4.


My daughter was having a great time with this project, she really loved how soft the batting felt.

Result:


I got the brown fabric from Zimmans, a upholstery fabric store north of Boston. They have a great selection of discounted remnants in their basement that could keep you busy for days just looking through everything. We attached the headboard to the bed frame by drilling holes in the legs and using bolts to secure the legs to the frame. 

This whole project took about half a day to complete, but so worth it. I have to thank my Mom again for all her help with this project.

Monday, November 4, 2013

Pinterest Kid Craft: Leaf Wreaths

I'm always looking for fun crafts to do with my 2 year old daughter. I came across this cute project to make wreaths out of fallen leaves.

Pin:

                          Making a fall leaf wreath with kids
This was pinned from Crafts for all Seasons.

This was a relatively cheap craft too. All we needed was paper plates ($2-$4), leaves (free), glue ($2) and scissors.


This was a great project because we got to go outside and get some energy out collecting the leaves, as well as having fun with arts and crafts. My daughter had a great time collecting the leaves and she really loved gluing the leaves onto the paper plates (with some help of course.)

Result:


Monday, October 28, 2013

Halloween: Minnie Mouse Costume

My daughter really loves the Mickey Mouse Club House and she can't get enough of Minnie Mouse. So, my grandmother and I decided to make her a Minnie Mouse costume. Most of the work was done by my grandmother, I struggle with sewing and she is really good at it. 

Result:


I had to order the fabric from Etsy.com because we could not find it in stores. This fabric came all the way from China, it took about two weeks to arrive after ordering. My grandmother sewed the dress from a pattern that she found and sewed a petticoat for under the skirt. We already had the ears and just taped on the bow. I bought her a long-sleeve black shirt and black leggings. I made the shoe covers from pieces of felt and added an elastic to keep it on her shoes. I made gloves that went with this costume as well, but she found them a little annoying so they were nixed.

Over all this was a little bit more expensive than I thought, mostly because of the shipping from China for the fabric. But, it is well made and we'll have it for dress up clothes for a while.

Monday, October 21, 2013

Knitted Bunny Hat

I knitted this bunny hat for my daughter about a month ago but I haven't gotten around to taking pictures of it until recently. I love taking fun knitting books out from our local library. I got this pattern from a book called, Animal Hats: 15 patterns to knit and show off. There are lots of fun hats to try in this book, I might even take it out again to try another hat. This hat was relatively easy and worked up very quickly, I finished it in less than a week. It uses bulky yarn, so it is perfect for cold winter weather. I used yarn that I already had so this didn't cost anything. If your local library does not have a copy of this book the image below has a link to amazon where you can pick it up for about $12.

Pattern:


Result:


My daughter is really into taking pictures recently. Especially, when I'm taking pictures.


Monday, October 14, 2013

Pinterest: Home Improvement: Vent Covers

For the longest time I have been looking for a solution to cover our hideously ugly heating vent covers. Our house was built in the 50s and it seems like the new vents that they sell in stores like Home Depot and Lowes don't fit our old vents. I knew we had to come up with something DIY. Then I came across this inspiration on Pinterest.

Pinterest:

                        A better looking return air grille Tutorial
This was pinned by The Friendly Home.

It just happened that my Dad was creating new radiator covers for my parents house and had a lot of patterned sheet metal from the old covers. He also offered to build them for us, he enjoys woodworking so it was a win/win. 

Our covers are a little different from The Friendly House's covers. My Dad designed them to be a wooden frame with the sheet metal in the center. We did not remove the old vent covers, these covers fit like a picture frame right over the old ones and are screwed right into the wall.


Result:

Before


After


Thanks Dad!

Monday, October 7, 2013

Knitted Shawl

For the last month I have been working on a knitted shawl. My grandmother subscribes to Knit 1-2-3 magazine and there are always tons of fun patterns to try. This beautiful shawl looked very appealing to me now that the weather is getting a little bit colder. I have links on these photos to the magazines' website if you are interested in getting the magazine.

                            Little Diamond Wrap                                                                  Issue 6

Result:


This took me a month but, I did not work on it everyday. I would think that if you worked on it regularly it would take about 2 weeks. This pattern takes #4 worsted weight yarn.

Monday, September 30, 2013

Pinterest Craft: Confetti Glasses

This is a Pinterest craft that I have been wanting to do for a while. I have always thought the idea of painting glass would be fun and interesting. I have many cheap vintage glasses in my attic that are begging to be transformed. So, I grabbed two and jumped in.


PIN:
                                        Such a fun idea!
I could not figure out who posted this to Pinterest so I'll link you to the pin itself, the pictures are pretty self explanatory so it was not hard to create. 


RESULT:


I had fun doing this, the only thing that I would change if I were to do this again would be to add more colors and instead of using the frosted glass paint, I would use regular glass paint. I bought the paint that I used at Michael's Craft Store, it was not too expensive. Here is a link to similar paints on amazon,

Monday, September 23, 2013

House Renovation: Almost There

So, in June we embarked on a pretty major renovation on our house. We decided to weatherize the three-season porch on the back of our house and turn it into two rooms. The porch is adjacent to our bedroom and our daughter's room, so we are adding a playroom and a home office. We also decided to do most of the work ourselves (mostly my husband and father). 

Before:


Now:

We also decided to redo our bedroom since it had not been touched since we moved into the house. The dressers that you see in this photo I refinished, they were originally a light brown, I went for a darker stain to give it a more Asian feel. Right now it is a bit of a mess, because everything got displaced with the renovation. 

Before:

Now:


Before:


Now:

Our new home office coming together.

Before:


After:


Our daughter's new playroom.

Hopefully by the end of October I'll be able to post the finished renovation. I am really looking forward to being able to use these spaces.